B2B Lead Generation Services
Helping technology marketers reach the right buyers, generate demand, and drive pipeline.
Explore All →


Who We Serve
Helping technology marketers connect with the right buyers in competitive markets.
Explore All →


VMware’s Cloud Automation Center (vCAC) is a tool that enables end users to consume the services that reside in your company’s data center while allowing administrators to maintain control over this consumption. In other words, vCAC brings to the enterprise cloud-like tools that can ease the workload on IT while enabling business units to provision their own services.
Deploying vCAC takes a little bit of work as there are three components to the tool:
It’s very important all three are in DNS correctly and that all the FQDNs are pingable from within the network. Before you begin, make sure that this is the case.
To begin we’ll deploy the Identity appliance which is downloaded from VMware.com. It will be deployed like any other virtual appliance. You’ll need to enter some network information and then power it on. You can connect to it by opening a browser and going to https://:5480 and then set the time by clicking on the Admin tab and specifying a time server.
Next, click on the SSO tab and enter a password for SSO. It is possible to use the SSO server from vCenter if you have SSO 5.1 and above with vCAC 6.0 and above. It may take several minutes for it to start, but when it’s done the SSO status will change to RUNNING.
While still under the SSO tab click on Host Settings and specify an SSO Host Name. Most likely you will use whatever name you’ve given your Identity appliance (ex: Identity). Put in the FQDN appended with the port, such as identity.mydomain.com:7444. Then click Apply.
Now click on SSL to apply the certificate settings. We can either generate a self-signed certificate or import a new certificate. If this is a production machine we’ll want to use a certificate from a certified authority. In the lab we can just generate a self-signed certificate. When you’ve filled in the appropriate information click on Replace Certificate and we will get a message that says “SSL Certificate is replaced successfully.”
Click on the Active Directory tab to set up the AD integration. Enter your domain name with the proper credentials and then click Join AD Domain. If it seems to be taking a really long time you might need to reload the page and login again. I ran into that a couple times. When you’ve successfully joined the domain it will say “Joined to domain MYDOMAIN.COM” next to status.
You’ll need to download the vCAC appliance from VMware.com as well. Again, we’ll deploy it as we would most other virtual appliances. Open a browser and go to https://:5480 to configure the vCAC appliance. Configure the Time Settings under the Admin tab first. Make sure you use the same time server as you did with the Identity appliance.
Now click on the vCAC Settings tab and under Host Settings click Resolve Host Name. If it’s set up properly it will automatically populate the CAFE Host Name. If that doesn’t work check your host name on the appliance. Make sure you remember to click Save Settings then. Under the SSL tab you can either generate a self-signed certificate or import one from a certified authority as you did with the Identity server.
Under the SSO tab you need to put the information from the Identity server in. Be sure to use the fqdn appended with port 7444. If you get errors back about communication problems make sure you used the fqdn for the certificate in the Identity server. See this troubleshooting article for more information.

Now you can click on the Licensing tab to put in the license. You can go through the rest of the tabs to confirm everything looks good and then we can move on to the IaaS Install.
For IaaS you need a Windows server 2008r2 and above. Supposedly it works with Windows 2012, but I just couldn’t make it happen. I’ve found several other people who’ve had issues with Server 2012 as well so we’ll be using Windows 2008r2 for this example. You’ll also need a SQL server. This server can either reside on the IaaS server or you can use an existing SQL server and specify that during setup. Once you have the IaaS server set up log on to it and do the following:
 *I highly recommend making use of Brian Graf’s vCAC 6 automated pre-req installation script. It will save you a ton of time and headache! https://blogs.vmware.com/vsphere/2013/12/vmware-vcloud-automation-center-6-pre-req-automation-script.html
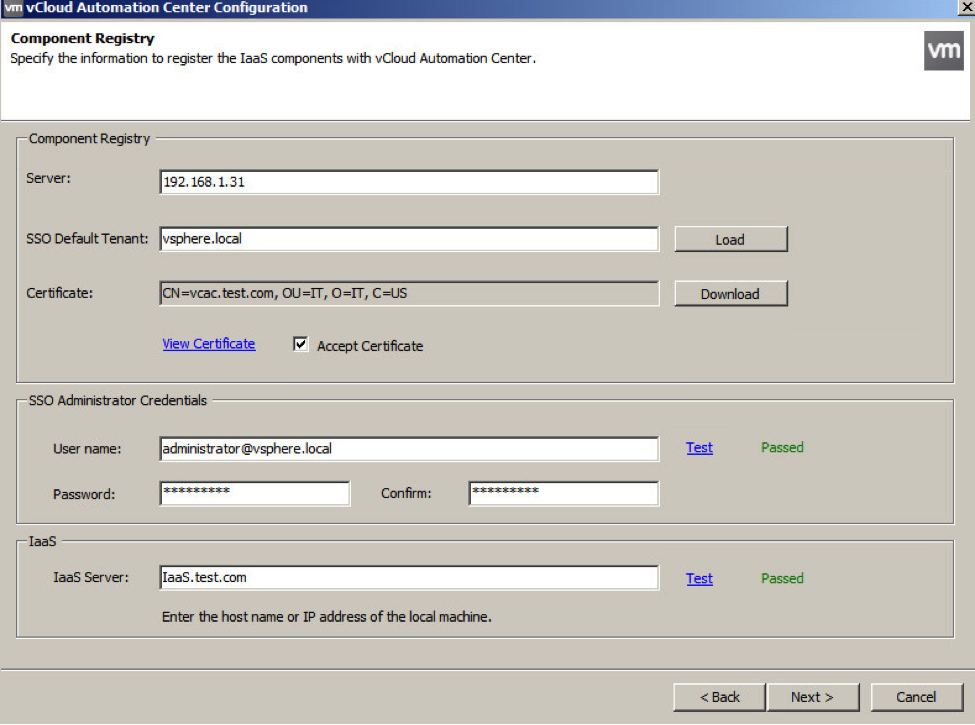
I had a lot of trouble with the IaaS installation of vCAC. What I learned was don’t even try it with Windows Server 2012 because the .NET Framework 4.5 is really frustrating to figure out. It also kept failing because of IIS issues. I had to make sure components were registered properly. If your installation keeps failing you might want to check out this blog post. After using the installation script for pre-reqs, by Brian Graf, I was finally able to get everything installed properly. In my opinion this would be a great candidate for a vApp! None the less, I’m really excited to get started with vCAC.


